Hacking into a Foscam FI9853EP camera, part 2
In my last post, I examined how to get U-Boot access and obtain the flash data from a Foscam FI9853EP camera. Whereas this data is very useful for offline analysis, I wanted to get a root shell so I can poke around in the system and run commands manually.
Extracting the root filesystem
Last time, we extracted a file called kernel.mtd, which contains an U-Boot uImage with the kernel itself. There will likely be an initrd (a root filesystem) embedded within this kernel, as it contains necessary files such as /sbin/init, the password file, startup scripts etc. This will be our initial target, but how do we get to it?
An easy way is to use binwalk, an utility intended to analyze, extract and reverse engineer firmware files. If we just run this on kernel.mtd, we learn the following:
|
|
|
|
The final line sure looks interesting: there’s a large blob om xz-compressed data there (we know it is large as it is the last item found). Fortunately for us, binwalk can copy all content it finds into files (--extract) and this can be done recursively (--matryoshka), which is convenient as we don’t want it to stop after extracting just the compressed data. Let’s give that a go:
|
|
|
|
Binwalk has found a cpio archive (which is what initrd uses) and extracted it for us to _kernel.mtd.extracted/_3BFC.extracted/_4FD8E8.extracted/cpio-root. We can start looking around.
Yay, root! (or not)
Let’s poke around and see if there is anything interesting:
|
|
|
|
Cool, we have the root password hash! Unfortunately, I’m not patient enough to feed this to a password cracker such as Hashcat.
We could try to update the passwd file and repack the initrd, but this is very tedious: we’d have to re-create the U-Boot uImage, with the proper headers, compression and all that. Perhaps there’s an easier way?
The boot process
The first userland program any UNIX-y system runs is called init (which is often implemented by systemd these days). Let’s see what our camera uses:
|
|
|
|
Busybox is very common on embedded devices and this camera is no exception. Googling around for a bit learns us that Busybox’s init uses /etc/inittab, so let’s see what that holds (comments stripped)
::sysinit:/etc/init.d/rcS

::respawn:/sbin/getty -L ttyS000 115200 vt100 -n root -I "Auto login as root ..."

::restart:/sbin/init

::ctrlaltdel:/sbin/reboot
::shutdown:/bin/umount -a -r
::shutdown:/sbin/swapoff -a
::sysinit:/etc/init.d/rcS
::respawn:/sbin/getty -L ttyS000 115200 vt100 -n root -I "Auto login as root ..."
::restart:/sbin/init
::ctrlaltdel:/sbin/reboot
::shutdown:/bin/umount -a -r
::shutdown:/sbin/swapoff -aI’m not sure about the auto-login bit, as it certainly greets me with a login prompt and not a root shell. However, we do learn that it runs /etc/init.d/rcS on startup, so let’s look at that:
|
|
|
|
OK, so it runs /etc/init.d/S<number>*. What do we have there?
|
|
|
|
Listing all of these would be boring, so let’s summarize what happens:
S00devs creates several devices in /dev, and mounts several filesystems:
/dev/mtdblock2->/mnt/app(squashfs)/dev/mtdblock3->/mnt/app_ext(jffs2)/dev/mtdblock4->/mnt/para(jffs2)
It will then add some symlinks:
/mnt/app/mtd/boot.sh->/mnt/mtd/boot.sh- [more which are not interesting for now]
S01udev, S80network and S90hiberate are not interesting for our purposes so I’ll skip them.
S90init is the final script. It will try to run either /mnt/para/Debug/boot.sh or /mnt/mtd/boot.sh (note that this is the symlink created by S00devs). These scripts reside on /mnt/app (squashfs) or /mnt/para (jffs2), which means they aren’t contained in the initrd! We ought to go with patching one of them and see what happens.
So we have a choice: we can create /Debug/boot.sh on the app_ext2 jffs2 filesystem, or patch /app/mtd/boot.sh on the app squashfs image. Whatever we put in those scripts will be run as root, and thus we can do whatever we want and hopefully end up with our own root user!
Deciding which one to use
I decided to patch the app squashfs – mainly because the para jffs2 contains settings and I wasn’t sure when it was updated (squashfs images are always read-only so no problem there). Initially, I went with the para jffs2 image but it turned out my flash dump was old and vital configuration files were missing, causing all kinds of problems. Maybe I’ll try again later.
At any rate, once we’ve patched the appropriate image, we can use U-Boot to write it into the flash and we’re done.
Extracting and patching the app squashfs
First step is to extract the image. It turns out there is a dedicated utility available, unsquashfs, which does exactly as it says on the tin:
|
|
|
|
That seemed to have worked! If we look at squashfs-root/mtd/boot.sh, it’s a shell script of almost 900 lines that does a lot of stuff. It ends with the following steps:
hostname IPCamera
#if [ -f ${APP_DIR}/zbin.tar.xz ];then
#   echo "The first time boot OK"
#else
    #rtctool -rtctosys
    MsgServer &
    update_ver
    killall udevd # free 464k mem memory
    sleep 5
    /usr/bin/watchdog &
#fi
hostname IPCamera
#if [ -f ${APP_DIR}/zbin.tar.xz ];then
# echo "The first time boot OK"
#else
#rtctool -rtctosys
MsgServer &
update_ver
killall udevd # free 464k mem memory
sleep 5
/usr/bin/watchdog &
#fiI found it interesting to see they killed udev after startup to reclaim extra memory. I added the following lines after hostname IPCamera:
|
|
|
|
This should show me that the modifications are active (by showing hello world) it would add a root user with the username qq and it would launch telnetd (which I also noticed on the image) so I can log in remotely.
Repacking the app squashfs
With the changes in place, we need to create our own squashfs image to flash into the device. However, we do need to make it compatible with the camera: it is pretty old and may not support everything squashfs supports these days.
Thankfully, unsquashfs has a -stat option to show this information:
|
|
|
|
A tool called mksquashfs can pack a directory into a squashfs image. Using the information above and verifying using unsquashfs -stat, I managed to find the correct flags after a few tries:
|
|
|
|
All that remains is to flash this into the camera!
Flashing the image
Since we have U-Boot access, the easiest way is to TFTP our patched image into memory and flash it. The previous blog post detailed the offsets of the flash, but I’ll repeat them here:
Creating 5 MTD partitions on "hi_sfc":
0x000000000000-0x000000080000 : "boot"
0x000000080000-0x000000380000 : "kernel"
0x000000380000-0x000000e80000 : "app"
0x000000e80000-0x000000f80000 : "app_ext"
0x000000f80000-0x000001000000 : "para"
Creating 5 MTD partitions on "hi_sfc":
0x000000000000-0x000000080000 : "boot"
0x000000080000-0x000000380000 : "kernel"
0x000000380000-0x000000e80000 : "app"
0x000000e80000-0x000000f80000 : "app_ext"
0x000000f80000-0x000001000000 : "para"This means our new app-hacked.mtd must be written to offset 0xe80000 and is 0xe80000 - 0x380000 = 0xb00000 bytes in length. First, we need to download the new image to memory:
hisilicon # setenv serverip 192.168.1.1
hisilicon # setenv ipaddr 192.168.1.2
hisilicon # tftp 82000000 app-hacked.mtd
hisilicon # setenv serverip 192.168.1.1
hisilicon # setenv ipaddr 192.168.1.2
hisilicon # tftp 82000000 app-hacked.mtdThen we have to initialize the flash, erase the correct bytes and write our new content:
hisilicon # sf probe 0
hisilicon # sf erase 380000 b00000
hisilicon # sf write 82000000 380000 b00000
hisilicon # sf probe 0
hisilicon # sf erase 380000 b00000
hisilicon # sf write 82000000 380000 b00000Now on to the scary part: trying it out!
Trying it out
Resetting the camera, keeping our fingers crossed and watching the boot logs is promising:
init phy power successful!
load hi_mipi driver successful!
==== Your input Sensor type is ov9732 ====
com v200 ptz
ptz_init start ptz_state[1],HorPos[0],VerPos[0]
setup ptz gpio success
setup zoom gpio success111
ptz_init end ptz_state[1],HorPos[-1],VerPos[-1],flag[0]
Hisilicon Watchdog Timer: 0.01 initialized. default_margin=60 sec (nowayout= 0, nodeamon= 0)
mkdir: can't create directory '/usr/local': File exists
hello world
 #### APP_VER_0:  2 == 2 ? ####
 #### not need to rewrite appVer_item0,old: 2 ####
 #### APP_VER_2:  2 == 2 ? ####
 #### not need to rewrite appVer_item2,old: 2 ####
 #### APP_VER_3: 30 == 30 ? ####
init phy power successful!
load hi_mipi driver successful!
==== Your input Sensor type is ov9732 ====
com v200 ptz
ptz_init start ptz_state[1],HorPos[0],VerPos[0]
setup ptz gpio success
setup zoom gpio success111
ptz_init end ptz_state[1],HorPos[-1],VerPos[-1],flag[0]
Hisilicon Watchdog Timer: 0.01 initialized. default_margin=60 sec (nowayout= 0, nodeamon= 0)
mkdir: can't create directory '/usr/local': File exists
hello world
#### APP_VER_0: 2 == 2 ? ####
#### not need to rewrite appVer_item0,old: 2 ####
#### APP_VER_2: 2 == 2 ? ####
#### not need to rewrite appVer_item2,old: 2 ####
#### APP_VER_3: 30 == 30 ? #### We see the hello world message, so we know our changed script was run. Let’s try to log in as qq:
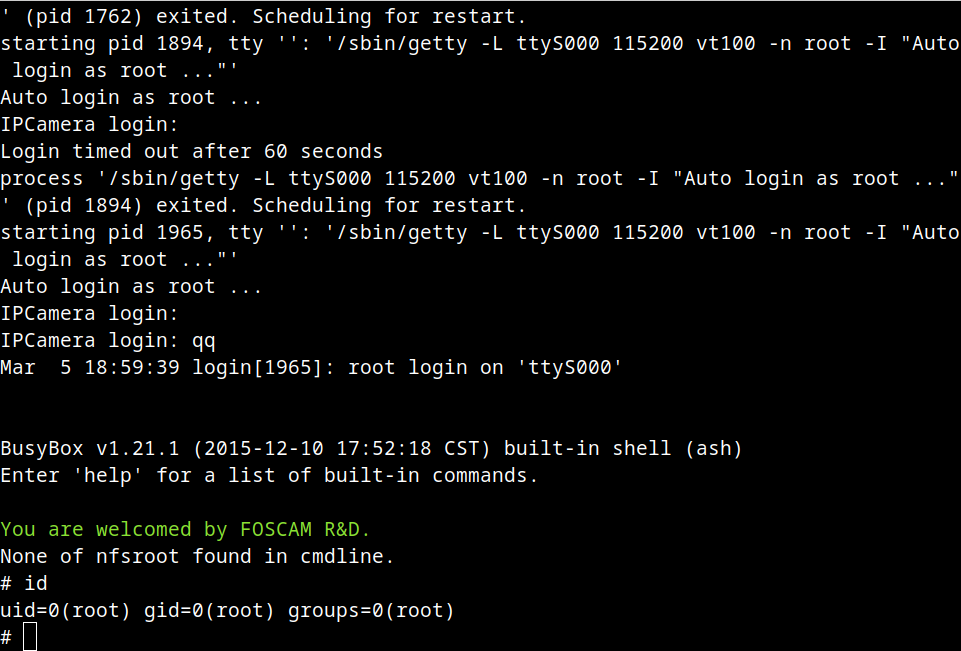
Awesome! I like the greeting message in there, I’m sure they expected someone to tinker with this device at some point 🙂
Next step: figuring out the update process
Having root access should make it a lot easier to poke around in the device and see what we can find. In the next step, I’ll dig into the firmware update process. Stay tuned!